Saturday, March 24, 2018

Finding the pub for the event mission

How to find a pub to finish the event quest chain for mission, "You Don't Have To Go Home".

The best and fastest way to find a pub is to cycle thru low level map zones called, "The Suburbs". Enter in the instance and roam around the center square area.

Here is a video clip of finding a pub inside that map instance.


The quest description says to search on city maps, but I found it easier to do it in the suburbs.  The layout of a city vs suburbs is very different and a pub stands out in a suburb vs a city.

Once you find a pub, all you have to do is go near it to trigger the mission complete.

Here is a screenshot of what one of the many pubs looks like from the outside.
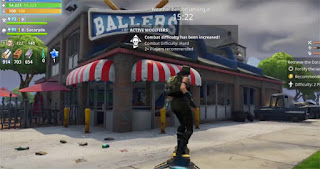
Pub Ballers Sports Bar

Friday, March 23, 2018

Gas Station locations Battle Royale Map

Challenge: Visit different Gas Stations

Use this map to find all the various location for gas stations on the battle royale map for Fortnite.

A red dot shown on the follow screenshot is where you can find a gas station location.


Click on image to enlarge the map.

Wednesday, March 21, 2018

Mission Types in Save the World Fortnite

Listed here are all the various mission types of Save the World Fortnite.

Mission Types - Fortnite PVE Mode


A dozen or so missions to choose from when leveling up on the PVE Mode of Fortnite.
  • Build the Radar Grid
    • Go to marked location on maps
    • Build the structure, use the diagram to fit sections
    • Build at least 3 in 20 minutes
  • Deliver the Bomb
    • Find the armory and launcher in the zone
    • Activate both structures and setup railing for bomb movement
    • Escort bomb from armory to launcher
    • Setup defense around launcher
    • Activate and defend until launcher attacks rift
    • Attack wave length is 4 minutes. 
    • Storm doesn't change directions, 2 angles of attack
  • Destroy the Encampments
    • Search zone for husk encampments
    • Destroy at least 5
  • Evacuate the Shelter
    • Shelter is under attack form the start, repel attack
    • Setup defenses for next attack wave
    • Defend the shelter
    • First attack during start, length depends on DPS levels to clear
    • Second attack wave length of 8 minutes
    • Storm can change directions, 2 angles of attack
  • Fight the Storm
    • Search the zone for atlas square structure
    • Fortify the structure and activate it with blue go
    • Defend the atlas until it fires
    • This mission can have multiple atlas
    • One attack wave with length of 8 minutes
    • Storm can change directions, 2 angles of attack
  • Launch the Rocket
    • End mission for zones, once completed it unlocks next map area.
  • Repair the Shelter
    • Find the shelter, fortify building
    • Activate, then search zone for module parts
    • Use See-bot to mark module part locations on map
    • Need to find 8 modules, then defend the shelter building
    • 2 Attack waves each 4 minutes long
    • Storm can change directions, 2 angles of attack
  • Rescue the Survivors
    • Search the zone for survivors
    • Many different types of mini missions and events
  • Retrieve the Data
    • Search the zone for a landing zone of the weather balloon
    • You will be able to see the balloon in the air
    • Fortify the location area
    • Wait out the timer until it lands, or shoot the balloon to trigger the event
    • One attack wave with length of 8 minutes
    • Storm can change directions, 2 angles of attack
  • Ride the Lightning
    • Find the van, fortify it, bring blue go
    • 2 Attack waves each 4 minutes long
    • Storm can change directions

Storm Effect Modifiers
Many missions have a storm effect which provides both positive and negative effects. Here list the run down on all the various modifers you can have listed in a mission.

Positive
  • Adept Abilities
    • Hero abilities do more damage
  • Adept Constructors
    • Constructors do more damage
  • Adept Outlanders
    • Outlanders do more damage
  • Adept Ninjas
    • Ninjas do more damage
  • Adept Soldiers
    • Soldiers do more damage
  • Building Constructors
    • Build, upgrade and repair costs reduced for Constructors
  • Concussive Shieldbreak
    • If shields deplete, nearby enemies take damage
  • Focused Ninjas
    • Ninja ability cooldowns and energy costs are reduced
  • Hardware Constructors
    • Constructors do more damage and crit more with hardware weapons
  • Headshot Soldiers
    • Soldiers do more damage with assault rifles when scoring headshots
  • Knockback Melee Attacks
    • Player melee attacks do increased knockback
  • Leaping Ninjas
    • Ninjas jump higher and can Mantis Leap more often
  • Melee Life Leach
    • Heroes heal by a percentage of the melee damage they deal
  • Powerful Assault Rifles
    • Assault Rifles do more damage
  • Powerful Axes and Scythes
    • Axes and Scythes do more damage
  • Powerful Clubs and Hardware
    • Club and Hardware weapons do more damage
  • Powerful Explosives
    • Explosive weapons do more damage
  • Powerful Shotguns
    • Shotguns do more damage
  • Powerful Pistols
    • Pistols do more damage
  • Powerful Sniper Rifles
    • Sniper Rifles do more damage
  • Powerful Energy Attacks
    • Player energy attacks do more damage
  • Powerful Swords and Spears
    • Spear and Sword weapons do more damage
  • Powerful Traps
    • Traps hit harder, fire more often and lasts longer
  • Sword Ninjas
    • Ninjas do more damage and crit more often with swords
  • Upgraded Outlanders
    • Outlanders can carry more frags and their abilities deal more damage
  • Well Drilled Soldiers
    • Soldier ability cool downs and energy costs are reduced

Negative
  • Acid Pools
    • Husks leave circle aoe effect on ground that causes damage
  • Concussive Shieldbreak

  • Empathy

  • Enraged
    • When enemies are near death, they become enraged, dealing more damage
  • Exploding Deathburst
    • Basic husks explode when killed, damaging players and buildings in the area
  • Frenzied Deathburst
    • When enemies die, they grant nearby enemies a brief move & attack speed increase
  • Healing Deathburst
    • When enemies die, they heal nearby enemies for a % of their maximum health
  • Life Leech Attacks
    • Enemies restore health each time they deal damage
  • Metal Corrosion
    • Basic husk melee attacks cause metal buildings to corrode, periodic dmg for a time
  • Shared Hero Damage
    • Whenever a player loses health, allies suffer damage equal to a % of that amount
  • Slowing Attacks
    • Whenever a player is struck by a melee atk, they move slowly for a short time
  • Slowing Pools
    • Enemies have a chance to leave a slowing pool on the ground when they die
  • Smoke Screens
    • Smoke screen when they die, granting enemy ranged damage resistance
  • Quickened
    • Enemies gain movement speed for a time after taking damage
  • Uncharted Enemies
    • Enemies don't show up on the minimap
  • Wall Weakening
    • Buildings become increasingly vulnerable to damage for a short time after they are attacked

Visual mythic lead personality chart

Mythic Lead Survivor Personality Chart
Use this chart to plan out F.O.R.T stats for end game purposes. First row shows F.O.R.T. alignment, second row survivor squad icons, third to fifth row shows personality type icon.
Mythic Lead Survivor Chart
Also available is a visual Mythic Lead Survivor List displaying all the characters, names and personalities.

The key to maximizing F.O.R.T. stats is to match up lead survivor personality with the other survivors in the team.  If you do not happen to have the mythic quality lead yet it would be best to plan out the team with one of the mythic lead personality sets so that when you do get it, your team will already match up correctly.